(These english muffins are much better than store bought and contain only a few natural ingredients. Making anything from scratch isn’t quick or super easy but this recipe is the easiest one I found.)
I made english muffins from scratch for the first time this morning. And I’ll be making these again — maybe every week.

English muffins are relatively cheap and available at grocery stores so why would anyone want to make their own? Two reasons:
- Chemicals: Read the ingredients on any store-bought english muffin package and the list of ingredients is long, with names of things I can’t pronounce.
- Taste: I’ve been buying Thomas brand english muffins and the taste is good but it always seems synthetic to me, especially the corn-flavored muffins. Is it real corn flavor or is it a corn flavor that was invented in some lab? I’m not sure. But one thing I’m certain of is the taste of these homemade english muffins far surpasses the store-bought processed ones.

I found several recipes online but this one from the kitchn.com was the easiest and used basic ingredients I had in my pantry. You don’t have to, but it’s best if you make the starter and dough the night before and let the dough rise in your refrigerator overnight. One other tip. You cook these muffins in a skillet on top of the stove under very, very low heat (when I did it, you could barely see the flames beneath the pan).

English Muffins From Scratch
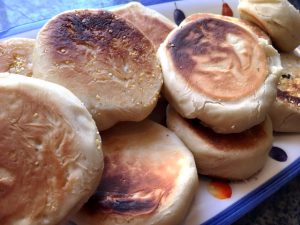
You can eat these english muffins a few minutes after frying them without toasting them, but I found putting them in a toaster for a minute, just to get a light crackle on them, was best.
Ingredients
- For the dough starter:
- All-purpose flour or bread flour, 3/4 cup (3 1/3 ounces)
- Water, 1/2 cup
- Active dry or instant yeast, 1/2 teaspoon, (or 2 tablespoons active sourdough starter)
- For the english muffin dough:
- Milk, whole or 2%, 1 cup
- Active dry or instant yeast, 1 teaspoon
- Sugar, 2 tablespoons
- Unsalted butter, melted, 2 tablespoons
- Salt, 1 teaspoon
- All-purpose or bread flour, 3 to 3 1/4 cups (13 1/2 to 14 1/2 ounces)
- Cornmeal for dusting
- Butter for the skillet
Directions
- Step 1 Make the dough starter: Mix the flour, water, and yeast for the starter in a small mixing bowl. Beat until the batter is smooth and glossy, about 100 strokes.
- Step 2 Let the starter sit 1 to 12 hours: Cover the starter and place it out of the way for at least 1 or up to 12 hours. The starter will become increasingly bubbly the longer it sits and will double in bulk. The longer you can let the starter ferment, the better the flavor and structure of your finished English muffins. (I let mine sit for about 6 hours and the taste was tangy but mild.)
- Step 3 Whisk together the milk, yeast, and starter: In the bowl of a stand mixer or large mixing bowl, combine the milk and yeast for the dough. Scrape the starter into the bowl and use a whisk to break it up and dissolve it into the milk. It should become quite frothy.
- Step 4 Mix the dough together: Add the sugar, butter, and salt to the bowl and whisk to combine. Add 3 cups of the flour and stir with a stiff spatula until you form a shaggy, floury dough.
- Step 5 Knead the dough: With a dough hook on a stand mixer, knead the dough until it comes together in a smooth ball, 5 to 8 minutes. Alternatively, knead by hand against the counter. If the dough is very sticky like bubble gum, add extra flour as needed, but err on the side of caution. The dough is ready when it forms into a smooth ball and springs back when poked. It will feel slightly tacky to the touch, but shouldn’t stick to the bowl or your hands. (I kneaded mine by hand and within a few minutes, the dough was smooth and springy.)
- Step 6 Let the dough rise overnight in the fridge: Transfer the dough to a large bowl lightly filmed with oil. Cover and place in the fridge overnight or for up to 3 days.
- Step 7 Divide and shape the muffins: Turn the risen dough out onto a lightly floured work surface. Use a pastry scraper to divide the dough into 12 equal pieces. Roll each piece gently against the counter to shape into smooth, round balls. (Don’t worry too much if each piece is the exact same size. Mine weren’t and yet I was pleased with the results.)
- Step 8 Transfer the muffins to a baking sheet to rise: Scatter cornmeal generously over a baking sheet and arrange the balls on top, spaced a little apart. If you have muffin rings, place them around the balls at this point. Sprinkle the tops of the balls with more cornmeal.
- Step 9 Let the muffins rise until puffy: For dough that was refrigerated, this will take 1 1/2 to 2 hours. For room temperature dough, this will take about 1 hour. Depending on the size of your muffin rings, the muffins may not totally fill the rings — that’s okay.
- Step 10 Warm a skillet: When ready to cook the muffins, warm a large skillet over medium heat. Melt a small pat of butter — enough to just coat the bottom of the pan and prevent sticking.
- Step 11 Cook the muffins 5 to 6 minutes on one side: Working in batches, transfer a few of the muffins to the skillet — allow an inch or so of space between muffins and do not crowd the pan. If using rings, transfer the muffins with their rings to the pan. Cook until the bottoms of the muffins are golden brown, 5 to 6 minutes. (I found that I had to keep the flame very low as the muffins cooked quickly and you really want to cook them slowly.)
- Step 12 Flip and cook 5 to 6 minutes on the other side: Flip the muffins and cook the other side until golden brown, 5 to 6 minutes. If you prefer thinner, less puffy English muffins, you can gently press the tops with the spatula to prevent them from rising too much.
- Step 13 Adjust the heat as needed: If your muffins seem to be browning too quickly on the bottoms (or not quickly enough), adjust the heat as needed. (If you find that your muffins are browning too quickly, throw them in the oven at 350°F to finish baking through.) (I found putting the muffins in the oven for a few minutes was a good idea to ensure the insides were cooked through.)
- Step 14 Finish cooking all of the muffins: Transfer cooked muffins to a cooling rack. Continue working in batches until all the muffins have been cooked. Add a small pat of butter to the pan between batches to prevent sticking.
- Step 15 Split and serve! Split the English muffins with a fork, spread with butter or jam (or both!), and eat. English muffins will keep for several days in an airtight container on the counter and are fantastic warmed in the toaster oven. Fresh English muffins can also be wrapped tightly in plastic wrap or aluminum foil, and kept frozen for up to 3 months.